Case Study: Linking Our Website With Google Instant Indexing API Using RankMath
How To Instantly Index Website on Google
Google Search Console is awesome. No doubt about it. However, if you are in the SEO industry for at least a couple of years, you surely have experienced some frustrating moments every now and then when Google takes ages to index a new page. No matter how many times you click on the Request For Indexing link on Google Search Console, there are times when a new page does not just get indexed!
Again, there are news websites and websites that talk about new trending topics. These websites need their content to be indexed as soon as possible. Even a 2-hour delay in getting indexed can cause the page to lose valuable traffic.
This is where RankMath’s Instant Indexing feature comes handy.
What Is Google Instant Indexing API?
We generally use the “submit URL” feature of Google Search Console to index our page on Google. However, sometimes it takes a long time for a page to get indexed even after using that submit URL feature for the nth time. In this case, Google search console acts as a middleman between Google and your website.
Google Instant Index removes the role of Google Search Console in indexing your page. It helps you to “directly notify” Google when you create a new web page or remove an existing page. As is the work of API, Google Instant Index API lets your website and Google talk to each other with no middleman in between. This makes indexing pages an almost real-time affair.
Using the Google Instant Index API you can –
Index your web page within one hour.
Index pages that are stuck in the “this page is not on Google” prison.
Index and remove pages that have a shorter life cycle.
Index pages on an urgent basis.
Our Purpose of Using Google Instant Index API
99% of the time Google Search Console is enough for us to index our website’s web pages. However, sometimes after we publish an important blog post, Google takes a lot of time to index the post.
Recently, one of our web pages was taking longer than usual to be indexed. We published the web page on 21st May.
Yet even after two and a half days, the web page remained not indexed. So we decided to use the Instant Indexing API using RankMath. RamkMath makes the process of connecting a website with Google’s Instant Index so much easier.
Important Note:
The main RankMath plugin has a default Instant Index feature. However, it is only useful if you are targeting Bing or Yandex. To get indexed by Google’s API, you need to download the sister app of the same company. We will talk about this in the later part of the article.
Implementing Google Instant Index API
RankMath has an impressively detailed blog post about how to integrate a website with Google’s Instant Index API. We basically followed that guide.
Prerequisite: You need to have the RankMath SEO plugin installed. You also need to install another plugin by RankMath, but we will talk about that later.
Part 1: Creating a Google Instant Index Project on Google Cloud Platform
Step 1 : Go To Google Cloud Platform
First we have to go to the appropriate page of Google Cloud Platform (which is the API page). Here’s a direct link to that page.
Upon clicking the link, you will see a screen like this (if you don’t have any existing Google Cloud instance).
Click to zoom
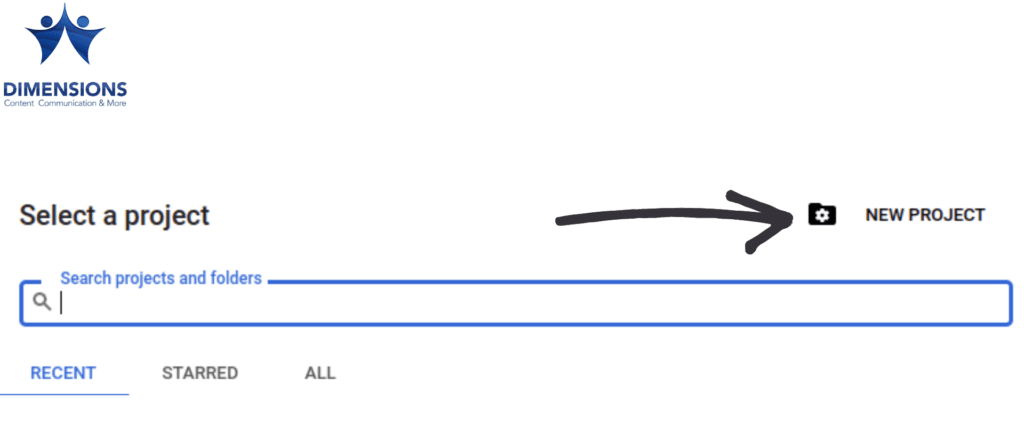
Step 2- Creating Project
Now click on the “create project” link on the right hand side and give a name to the new project. Be descriptive. It will help you later.
Then click on the ‘New Project’ link.
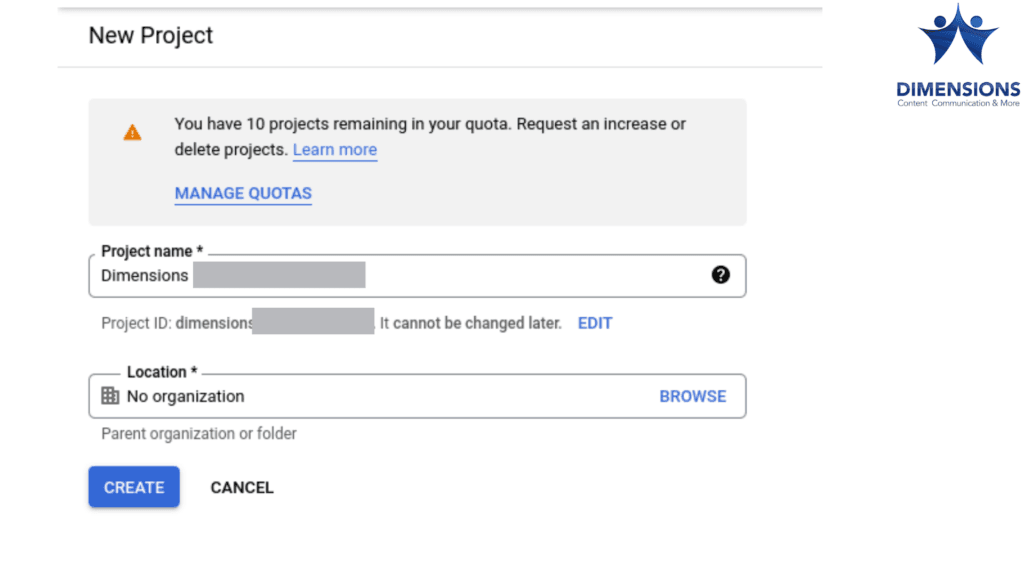
Step 3: Project Name
Give a name to the new project. Be descriptive. It will help you later.
Then click Create. No need to select any organisation.
Step 4: Confirmation
Google will now ask you to confirm that the project you created just now is the one which you want to modify and connect with the API. Just click Next.
Google Cloud Platform will then ask you to enable the Indexing API for the selected project.
Click on the ‘enable’ link.
Part 2: Creating a Service Account For The Project We Created
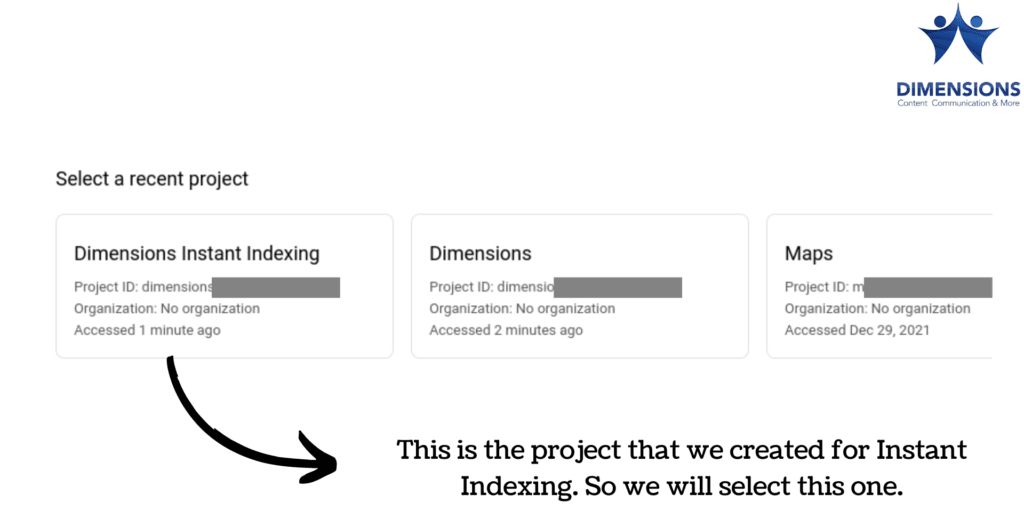
In the second part, we will be creating a service account for the project we just created.
You will see a list of all your recent projects. Click on the one you just created.
Step 2:
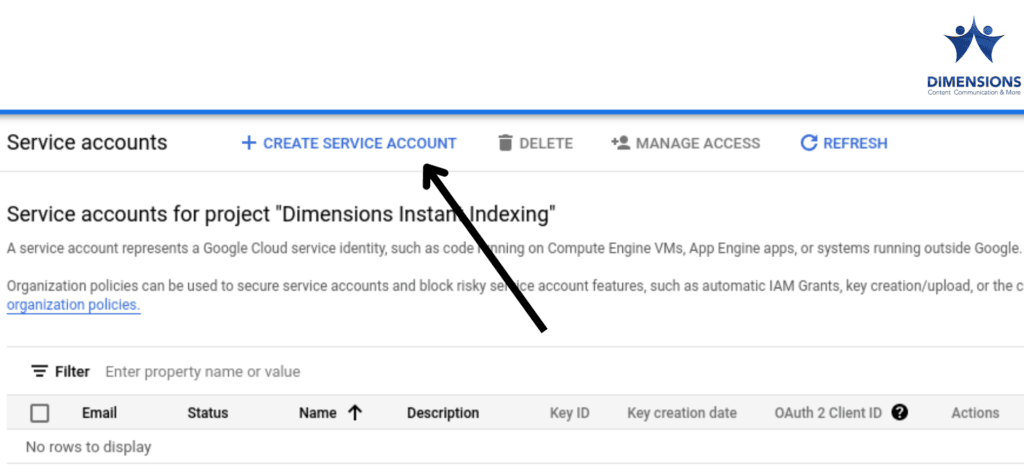
After clicking on the service account, you will see a page like this.
Just click on the ‘Create Service Account’ link at the top.
Step 3:
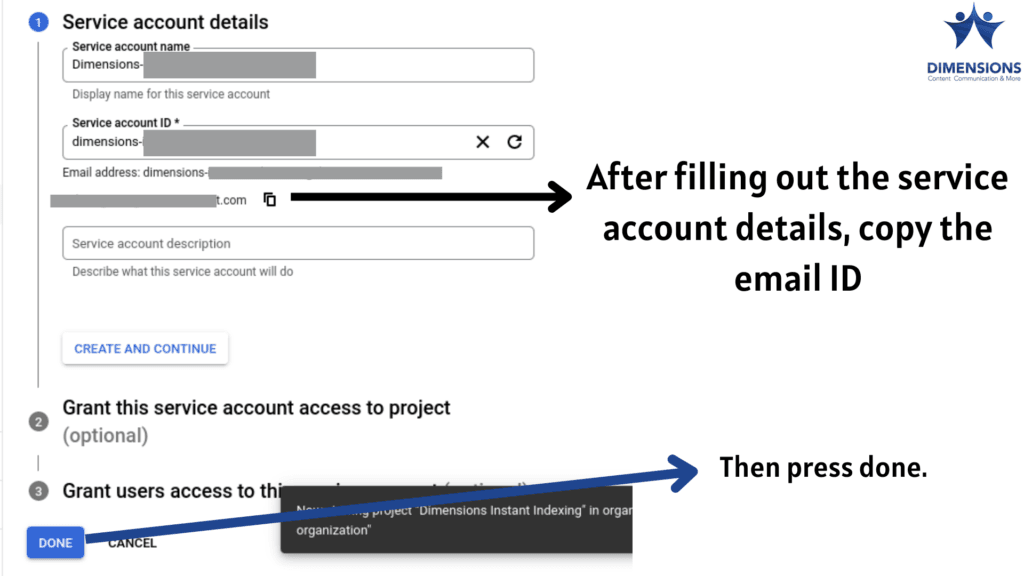
On the ‘Create Service Account’ window, you will be prompted to give a name for your service account. Be descriptive, but don’t use the same name as that of the project. It will be confusing.
You will now see a Service Account ID just below the Service Account name. Can you see an Email address below the ID? Copy it. Note- The email address might overflow to the next line. Don’t overlook that. Copy the whole address.
When copied, press ‘Done’.
Step 4:
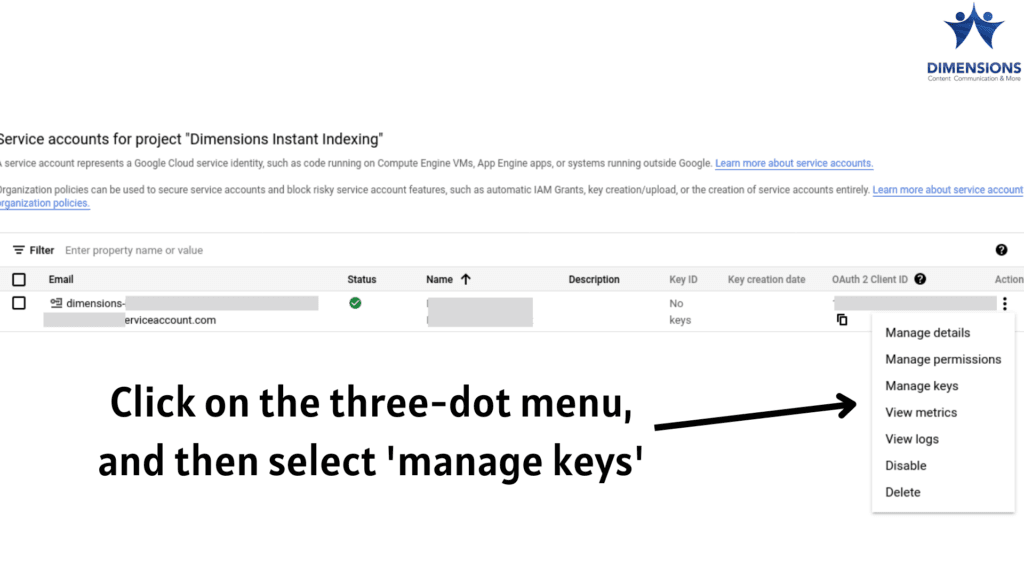
Once you create the service account, you will see that the Service Account email ID is now appearing on the list. On the right hand side, you’ll see a three-dot menu. Click on it and then select the ‘Manage Keys’ option.
Step 5
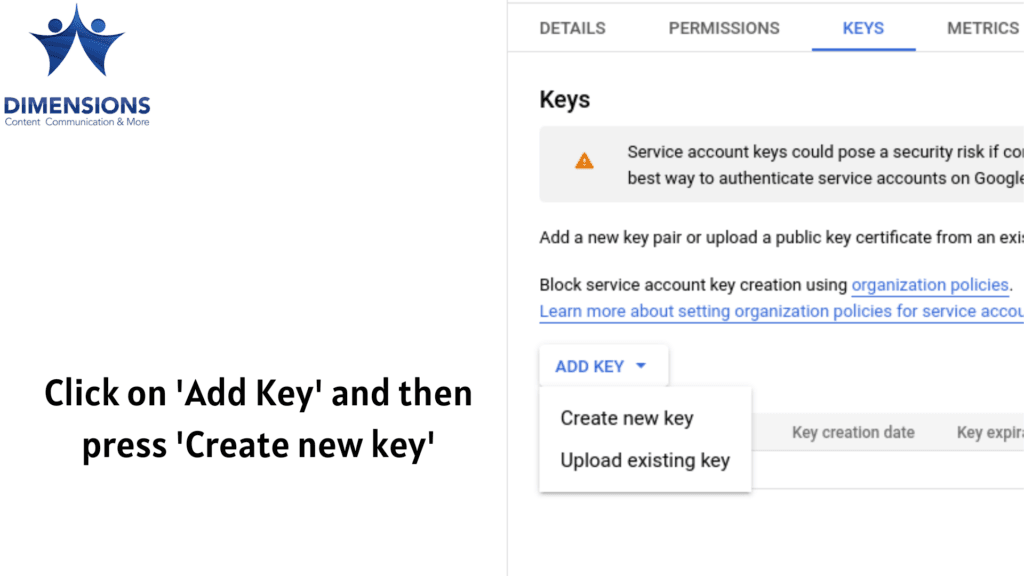
Now it’s time to create a new key for the Service account. Click on the ‘Add Key’ menu and then select ‘Create New Key’. You will be given two options – JSON and P12. Select JSON and the key will be downloaded to your computer.
Part 3: Giving The Service Account Email Access To Google Search Console
You now have to give access to the Search Console for the website where you want to implement Google Instant Index.
Remember the email id that you copied? It will now be needed.
Go to your Google Search Console account for the website
Click on settings from the left menu.
Then select ‘users and permissions.’
Can you see the blue ‘Add User’ button? Click on it.
Paste the email id that you copied.
Give Ownership permission to the ID.
Part 4: Installing and Setting Up The RankMath Google Instant Index Plugin
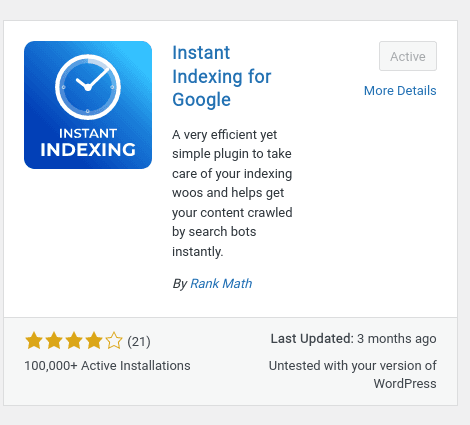
As we said, the main RankMath plugin is not the one that offers Google Instant Indexing API support. You have to download this plugin made by the same company –
The plugin is available on the official WordPress Plugin store.
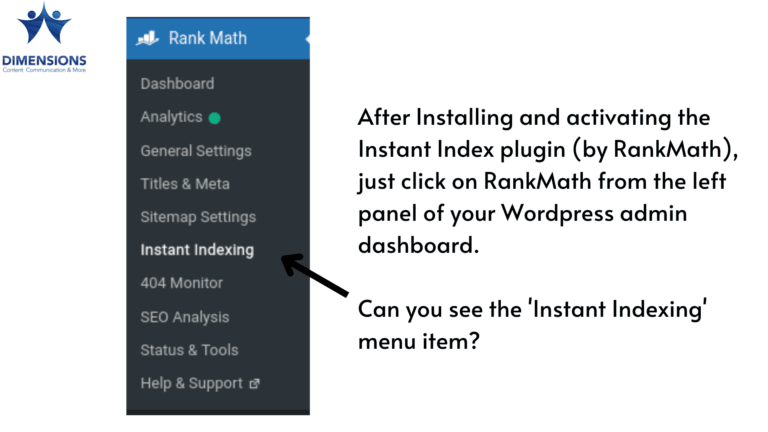
After installing the plugin to your WordPress website, it will automatically be integrated with the main RankMath plugin. Just click on RankMath from the WordPress left panel menu and you will see ‘Instant Indexing’ as one of the items.
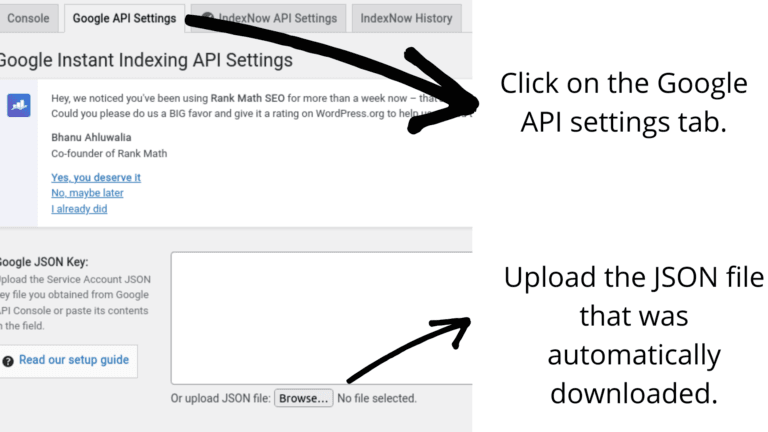
Now click on the Instant indexing menu. You will see four tabs. Click on the Google API settings tab and then upload the JSON file that was downloaded.
Finally, click on Save Changes.
You are all set!
Final Part: How To Use Google Instant Indexing
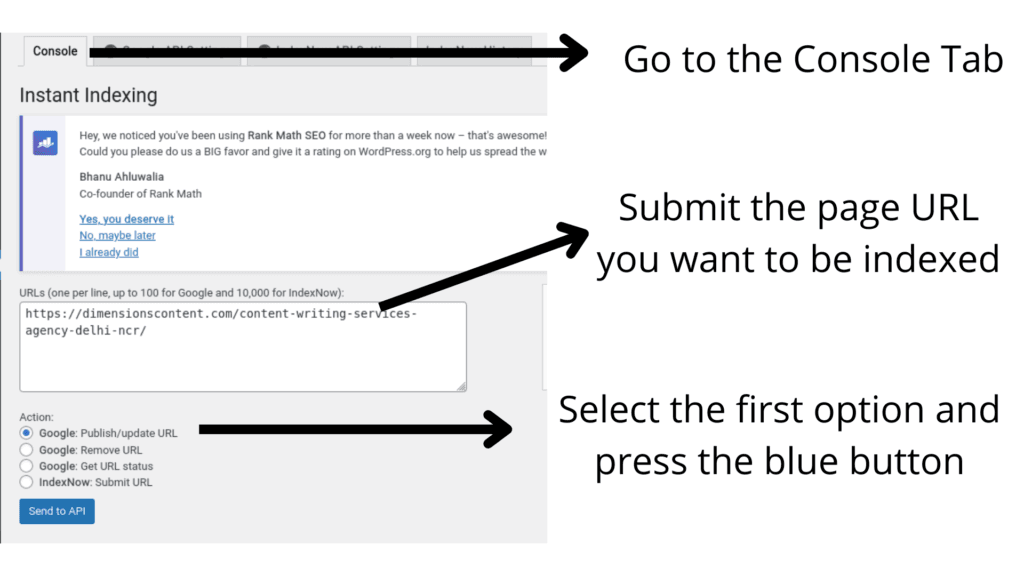
After this fairly complex process, click on the RankMath menu from the WordPress left hand panel. And then click on Instant Indexing.
You can see four tabs. Go to the first tab – Console, if you are not already there.
In the text input field, paste the URL of the page you want to index. And from the Action menu select “Google: Publish/Update URL”
And then press the “Send To API” button, that’s it!. If all goes well, you will see a success message.
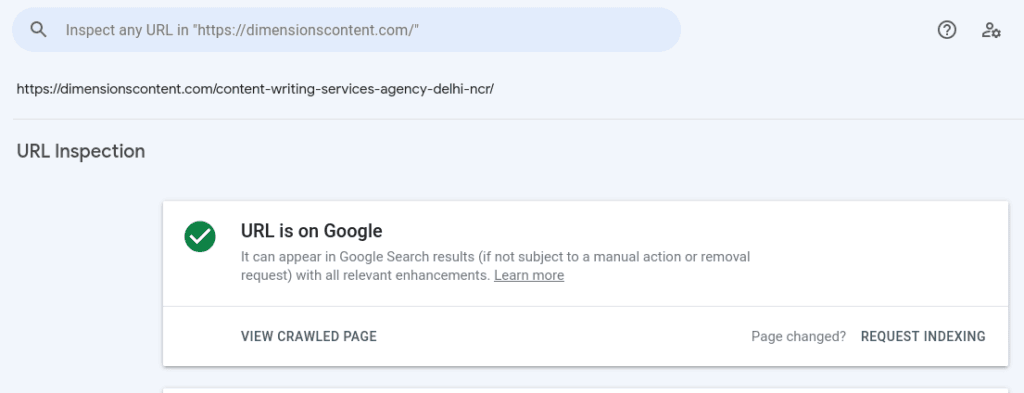
Wait for 30 to 60 minutes to see your page indexed!
Our page was indexed within 40 minutes!
That’s the magic of Google Instant Indexing. Use it to index those pages that have remained not indexed for days. Use it to rank pages with the blink of an eye!
Need Content For Your Website?
Contact Us!
This Content Has Been Written By a Human Being No AI Used
This Content Has Been Written By a Human Being No AI Used!